This is the second part of a 2-part series. To see part 1, click here
In the first blog, we discussed the planning needed for deploying Azure Sentinel in a multi-tenancy environment. In this part, we’ll go through the actual deployment itself.
Deploying Azure Log Analytics and Azure Sentinel
If you don’t already have Azure Log Analytics and Azure Sentinel deployed, you will need to deploy them.
We’ve created an ARM Template to help you with this process:
{
"$schema": "https://schema.management.azure.com/schemas/2015-01-01/deploymentTemplate.json#",
"contentVersion": "1.0.0.0",
"parameters": {
"workspaces_name": {
"type": "String"
},
"retentionInDays": {
"defaultValue": "90",
"type": "String"
},
"location": {
"type": "string",
"defaultValue": "[resourceGroup().location]",
"metadata": {
"description": "Location for all resources."
}
}
},
"variables": {
"solutions_SecurityInsights_name": "[concat('SecurityInsights(',parameters('workspaces_name'),')')]"
},
"resources": [
{
"name": "[parameters('workspaces_name')]",
"type": "Microsoft.OperationalInsights/workspaces",
"apiVersion": "2015-11-01-preview",
"location": "[parameters('location')]",
"properties": {
"sku": {
"name": "pergb2018"
},
"features": {
"searchVersion": 1
},
"retentionInDays": "[parameters('retentionInDays')]"
}
},
{
"type": "Microsoft.OperationsManagement/solutions",
"apiVersion": "2015-11-01-preview",
"name": "[variables('solutions_SecurityInsights_name')]",
"location": "[parameters('location')]",
"dependsOn": [
"[resourceId('microsoft.operationalinsights/workspaces', parameters('workspaces_name'))]"
],
"plan": {
"name": "[variables('solutions_SecurityInsights_name')]",
"promotionCode": "",
"product": "OMSGallery/SecurityInsights",
"publisher": "Microsoft"
},
"properties": {
"workspaceResourceId": "[resourceId('microsoft.operationalinsights/workspaces', parameters('workspaces_name'))]",
"containedResources": [
]
}
}
]
}
You can deploy this using either Azure Portal or PowerShell.
Deployment Using Azure Portal
To deploy the template using Azure Portal, first navigate to Azure Portal and sign in.
Then, on the top search bar, search for Deploy a custom template:

Navigating to custom deployment
In the Custom deployment screen, click Build your own template in the editor:
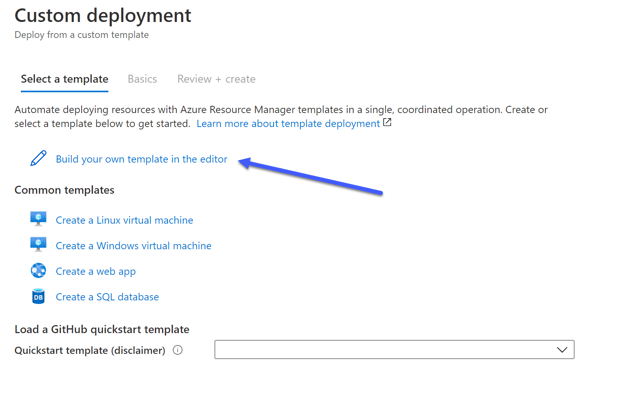
Build your own template
Next, replace the empty template with the template provided above. This template will add the resources we want to deploy.
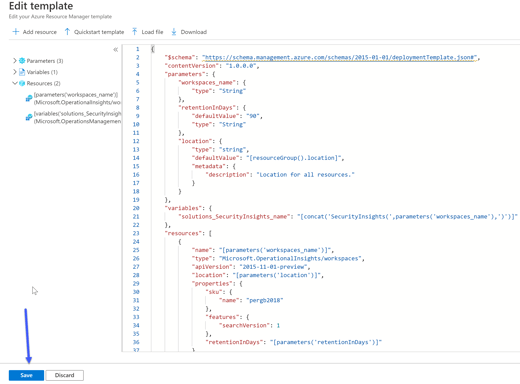
Editing the template
Click Save.
Finally, provide the following information for the template.
- Subscription – The name of the subscription you want to deploy the resources to
- Resource Group – The name of the Resources group that you want to deploy the resources to; create a new one, if you did not previously create one
- Workspaces_name – The name of the Azure Log Analytics workspace
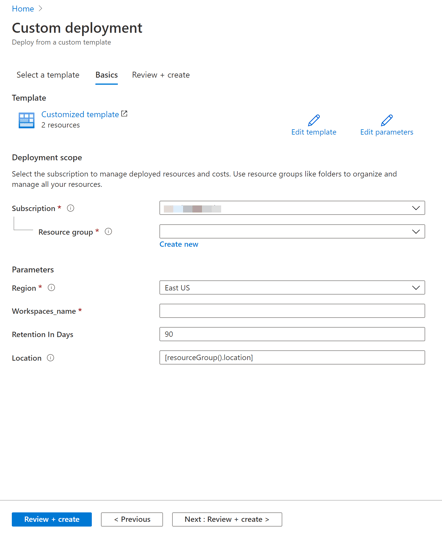
Fill in the information needed
Click on Review + create to deploy the resources.
Deploying Log Analytics and Azure Sentinel Using PowerShell
To deploy the resources using PowerShell, make sure you first establish an active session with PowerShell.
Creating a Resource Group
With the New-AzResourceGroup, you can create a new resource group. Inside the Resource group, you can deploy the Log Analytics Workspace and Sentinel, and this is the Resource group that will be delegated.
Every resource in Azure requires a location to be deployed to. The location is referring to the Datacenter region. In this Guide, I will use the West Europe region.
New-AzResourceGroup -Name "Sentinel-RG" -Location "WestEurope"
You will be asked for the Log Analytics Workspace name.
Deploying the Template
Because this is an ARM template deployment, We can use the New-AzResourceGroupDeployment cmdlet.
New-AzResourceGroupDeployment -ResourceGroupName "Sentinel-RG" -TemplateFile .\DeploySentinel.json
Deploying Azure Lighthouse
To deploy Azure Lighthouse, navigate again to Deploy a custom template In the Azure Portal.
On the Custom deployment page, click on Build your own template in the editor.
Next, you will need to replace the empty template, but this time with the following:
{
"$schema": "https://schema.management.azure.com/schemas/2018-05-01/subscriptionDeploymentTemplate.json#",
"contentVersion": "1.0.0.0",
"parameters": {
"mspOfferName": {
"type": "string",
"metadata": {
"description": "Specify the name of the offer from the Managed Service Provider"
}
},
"mspOfferDescription": {
"type": "string",
"metadata": {
"description": "Name of the Managed Service Provider offering"
}
},
"managedByTenantId": {
"type": "string",
"metadata": {
"description": "Specify the tenant id of the Managed Service Provider"
}
},
"authorizations": {
"type": "array",
"metadata": {
"description": "Specify an array of objects, containing tuples of Azure Active Directory principalId, a Azure roleDefinitionId, and an optional principalIdDisplayName. The roleDefinition specified is granted to the principalId in the provider's Active Directory and the principalIdDisplayName is visible to customers."
}
},
"rgName": {
"type": "string"
}
},
"variables": {
"mspRegistrationName": "[guid(parameters('mspOfferName'))]",
"mspAssignmentName": "[guid(parameters('rgName'))]"
},
"resources": [
{
"type": "Microsoft.ManagedServices/registrationDefinitions",
"apiVersion": "2019-06-01",
"name": "[variables('mspRegistrationName')]",
"properties": {
"registrationDefinitionName": "[parameters('mspOfferName')]",
"description": "[parameters('mspOfferDescription')]",
"managedByTenantId": "[parameters('managedByTenantId')]",
"authorizations": "[parameters('authorizations')]"
}
},
{
"type": "Microsoft.Resources/deployments",
"apiVersion": "2018-05-01",
"name": "rgAssignment",
"resourceGroup": "[parameters('rgName')]",
"dependsOn": [
"[resourceId('Microsoft.ManagedServices/registrationDefinitions/', variables('mspRegistrationName'))]"
],
"properties":{
"mode":"Incremental",
"template":{
"$schema": "https://schema.management.azure.com/schemas/2015-01-01/deploymentTemplate.json#",
"contentVersion": "1.0.0.0",
"parameters": {},
"resources": [
{
"type": "Microsoft.ManagedServices/registrationAssignments",
"apiVersion": "2019-06-01",
"name": "[variables('mspAssignmentName')]",
"properties": {
"registrationDefinitionId": "[resourceId('Microsoft.ManagedServices/registrationDefinitions/', variables('mspRegistrationName'))]"
}
}
]
}
}
}
],
"outputs": {
"mspOfferName": {
"type": "string",
"value": "[concat('Managed by', ' ', parameters('mspOfferName'))]"
},
"authorizations": {
"type": "array",
"value": "[parameters('authorizations')]"
}
}
}
Click on Save after making these changes to the template.
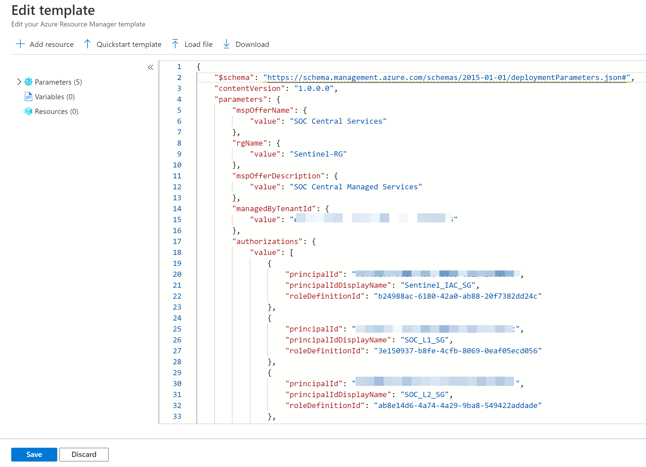
On the next screen, you will be asked to fill in the parameters. Click on Edit parameters.
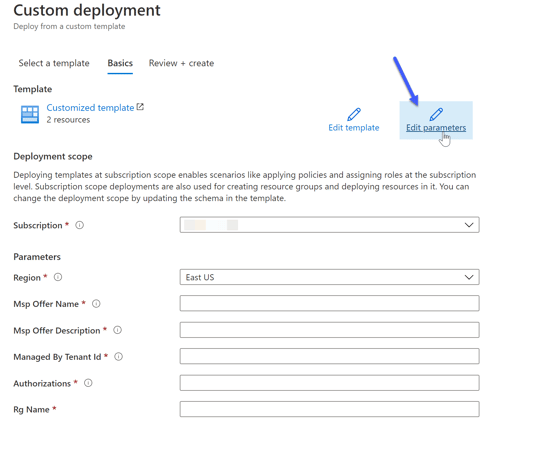
Editing the parameters
In this screen, copy the following JSON file:
{
"$schema": "https://schema.management.azure.com/schemas/2015-01-01/deploymentParameters.json#",
"contentVersion": "1.0.0.0",
"parameters": {
"mspOfferName": {
"value": "SOC Central Services"
},
"rgName": {
"value": "Sentinel-RG"
},
"mspOfferDescription": {
"value": "SOC Central Managed Services"
},
"managedByTenantId": {
"value": "XXXXXXXX-XXXX-XXXX-XXXX-XXXXXXXXXXXX"
},
"authorizations": {
"value": [
{
"principalId": "XXXXXXXX-XXXX-XXXX-XXXX-XXXXXXXXXXXX",
"principalIdDisplayName": "Sentinel_IAC_SG",
"roleDefinitionId": "b24988ac-6180-42a0-ab88-20f7382dd24c"
},
{
"principalId": "XXXXXXXX-XXXX-XXXX-XXXX-XXXXXXXXXXXX",
"principalIdDisplayName": "SOC_L1_SG",
"roleDefinitionId": "3e150937-b8fe-4cfb-8069-0eaf05ecd056"
},
{
"principalId": "XXXXXXXX-XXXX-XXXX-XXXX-XXXXXXXXXXXX",
"principalIdDisplayName": "SOC_L2_SG",
"roleDefinitionId": "ab8e14d6-4a74-4a29-9ba8-549422addade"
},
{
"principalId": "XXXXXXXX-XXXX-XXXX-XXXX-XXXXXXXXXXXX",
"principalIdDisplayName": "SOC_L2_SG",
"roleDefinitionId": "87a39d53-fc1b-424a-814c-f7e04687dc9e"
},
{
"principalId": "XXXXXXXX-XXXX-XXXX-XXXX-XXXXXXXXXXXX",
"principalIdDisplayName": "Executives_SG",
"roleDefinitionId": "acdd72a7-3385-48ef-bd42-f606fba81ae7"
}
]
}
}
}
Editing the parameters
When you finish copying the script, click Save.
You will be sent back to the previous page, but this time, all the parameters will be filled in from the template.
The following is a quick explanation, that will help you understand what you are deploying:
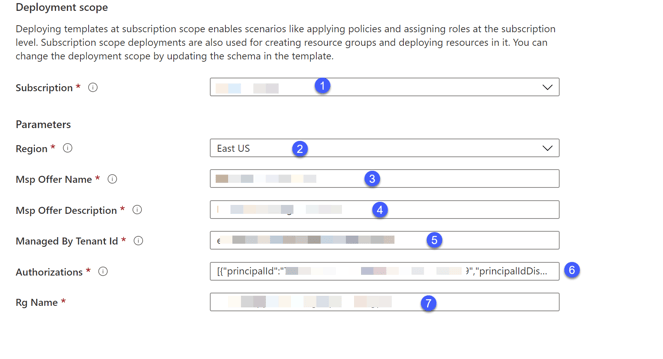
Lighthouse deployment scope
- Subscription: The Subscription where Log Analytics and Sentinel were deployed.
- Region: The Region where Log Analytics and Sentinel were deployed.
- Msp Offer Name: The name of the Managed Service Provider’s name. You will use it later; make sure to choose a good name.
- Msp Offer Description: The description of the Managed Service Provider.
- Managed By Tenant Id: The Tenant Id that you delegate permissions to.
- Authorizations: The Identities from the Managed Services Tenant, and the RBAC roles they receive.
- Resource Group: The name of the Resource Group that you want to delegate permissions to.
Click on the Review + Create button. If all validations pass, you will be able to deploy the template and successfully onboard your resource group.
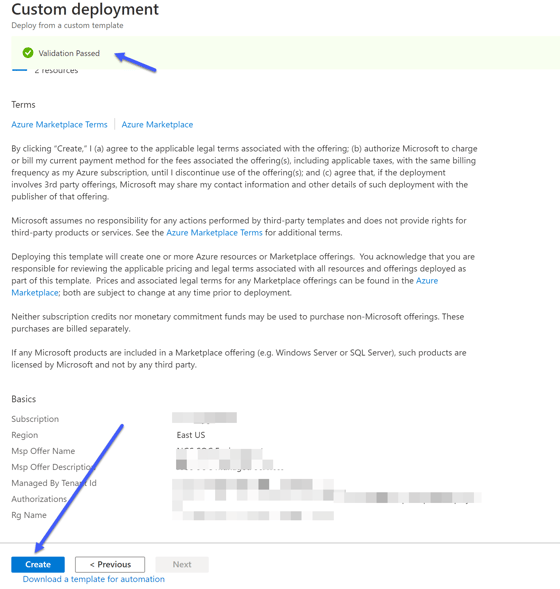
Validation passed – and the template can be deployed
Deploy Lighthouse Template Using PowerShell
In this case, the TemplateParameterFile needs to be provided. The same New-AzResourceGroupDeployment cmdlet is used.
New-AzResourceGroupDeployment -ResourceGroupName "Sentinel-RG" -TemplateFile .\rgDelegatedResourceManagement.json -TemplateParameterFile .\rgDelegatedResourceManagement.parameters.json
Note: MAKE SURE YOU ARE CONNECTED TO THE RELEVANT TENANT AND SUBSCRIPTION BEFORE DEPLOYMENT!
Verify Your Deployment
To verify that you deployed everything as expected, you can do several things. Note that it can take up to 10 minutes after the deployment was completed, before the changes can be seen.
From the Central Tenant
From the central tenant, navigate to My Customers. In the My Customers page, navigate to Delegations or Customers, where you should see all the delegations in your tenant.
From the Managed Tenant
From the managed tenant, navigate to Service providers. In Service providers, navigate to Delegations where you should see all of the delegations in your tenant.
Azure Lighthouse eases the management of a multi-tenancy environment - and with Microsoft adding many new features for Multiple Azure Sentinel workspaces, we highly recommend Azure Lighthouse as part of your Azure Sentinel deployment.
We hope that this post provided a useful overview of how to deploy and manage Azure Sentinel SIEM in a multi-tenancy environment.
Azure Lighthouse eases the management of a multi-tenancy environment – and with Microsoft adding many new features for Multiple Azure Sentinel workspaces, we highly recommend Azure Lighthouse as part of your Azure Sentinel deployment.
You can read part 1 of this post here. For more information, be in touch with the CyberProof team today!